

Can You Shoot Nails Through Floor Leveling Compound
1 / 17

The Right Flooring Leveler Selection for in-Floor Oestrus
Self-leveling underlayment is a great pick under any tiled floor, just it's the absolute best option when installing tile over an in-floor heating system. Cement board won't piece of work, and if you cull to lay down a mortar bed information technology takes longer, information technology'southward harder to achieve an even surface, and the screeding process can damage the heating cables or mats.
ii / 17

Clean the Flooring
Thoroughly sweep and vacuum the unabridged flooring. The floor needs to exist primed before calculation the floor leveler and you'll want the primer to soak into the floor, non the dirt and grit sitting on top of it. Keep a marker or curl of record in your pocket while you lot're vacuuming, and marking all the holes or cracks in the wood that volition need to exist sealed up.
3 / 17

Caulk and Tape Over Holes and Seams
If the liquid leveler is not totally contained, yous will stop up with a big mess on your hands and probably have to re-pour the floor leveler. Seal all holes and seams in the plywood with caulk. The leveler will drain through an opening as small-scale every bit a nail hole, so be thorough. A good pick for filling those holes and cracks is the type of caulk that goes on white but turns articulate when it dries because y'all can tell when it is done setting upwards.
Taping over the caulk isn't required but it'southward a terrific way to avert stepping in a glob and tracking it around the rest of the firm. When working on an older firm with flooring planks instead of plywood, cover the whole flooring in self-adhering roofing underlayment.
4 / 17

Install Sill Sealer at the Walls
Sill sealer is a cream gasket that framers utilise to seal the connectedness betwixt a foundation and the bottom wall plate. Sill sealer also makes a swell barrier to keep the liquid underlayment from escaping into other rooms or into the basement on exterior walls. Hold information technology in identify with staples. Keep the staples low enough and then the staple holes will be subconscious by the base trim. Either 3-ane/2-in. or 5-1/2-in.-wide sill sealer volition piece of work, but the taller it is, the more than protection it provides painted walls from flooring leveler splashes.
5 / 17

Caulk the Sill Sealer To the Floor
Smear the caulk with your finger to make sure it adheres to both surfaces. One time the pour is complete the sill sealer tin easily be cut affluent with a razor. The small-scale void about the wall won't negatively touch on the tile installation.
6 / 17

Install Paper-thin Around Vents and Drains
Large holes like heating vents and flooring drains tin can be isolated with cardboard before pouring your floor leveler. Just shape the cardboard to the hole, record it in identify, and then caulk it o the floor. The boxes that hold the flooring are often a convenient source of paper-thin.
7 / 17

Build Dams in Doorways
Dam up doorways with strips of wood. Brand sure you lot seal the forest to the floor with caulk also as the expanse where the wood strip meets the sill sealer.
viii / 17

Prime number the Wood
Wood floors need to exist primed before covering them with self leveler. The floor volition be covered with water-saturated leveler, which volition cause the wood to great. Information technology volition compress dorsum down when information technology dries, which could cause cracks in the underlayment and tiles above. The primer prevents the forest from absorbing water. Primer can be rolled, brushed, or even sprayed on with a canteen.
nine / 17

Install the Lathe
Lathe adds strength to the underlayment like rebar adds strength to concrete. Avoid metal lathe when working with in-flooring heating. Check with the manufacturer of the heating system whether the lathe should exist installed over or nether the mat/cables.
- Overlap the lathe at least three inches, and secure it with a tacker hammer stapler.
- Continue the lathe 1-in. or so away from the walls and then information technology doesn't poke through the sill sealer when installing information technology.
- Try to keep the lathe as apartment equally possible so it doesn't rise higher than the depth of your pour.
- Always check the continuity of the heating cables or mats earlier you start mixing. If you accidentally sever or nick a cablevision, it's a lot easier to repair it before the underlayment is poured.
ten / 17

Order More Floor Leveler Than Y'all Need
Running out of leveler before a cascade is finished is kind of a big deal, and so don't do it! Buy 20 percent more floor leveler than you recall you need. A big room poured even ane/xvi-in. thicker than predictable can gobble up several additional bags of flooring leveling compound. Besides, bags of leveler can exist ruined by wicking upward moisture from the ground. Keep your bags dry by setting them on a pallet or a canvas of plywood resting on scrap 2x4s, the same style you would protect bags of concrete mix.
xi / 17

Fill the Mixer Bucket
Keep a bucket on hand to place the mixer in when you're non using it. Fill the saucepan 3/4 full of water. That style the floor leveling chemical compound won't stick to the paddle and the bucket won't tip over when you stick the heavy mixer in it.
12 / 17

Prep the Floor Leveler Bags
Near bags filled with dry out cementitious mixes have a vent in the summit. It's at that place and then the bags don't bosom open when they're handled. Minimize the mess produced by floor leveling chemical compound by keeping the vent side upwardly. Line the open bags up next to the buckets. Mixing is a messy business, so exercise it outdoors whenever possible. Extreme temperatures tin affect the fourth dimension it takes the leveler to ready up, and then never mix upwardly super cold leveler or piece of work in the blistering hot dominicus.
xiii / 17

Brand a Fill Bucket
Brand a bucket that tin be filled quickly. Fill up a clear bucket with the proper amount of water and draw a fill-line with a marker on the exterior of the bucket. Some other pick is to drill holes at the fill-line so the saucepan will drain to the proper level. Dipping a bucket into a butt filled with water is a lot faster than filling it with a garden hose over and over again.
14 / 17

Mix a Bunch of Flooring Leveler at One time
Fill all the buckets with the recommended corporeality of water earlier you start mixing. Proceed the buckets shut to each other to reduce the mess when moving the mixer from one bucket to another. Keep all of the bucket handles facing out so they're easier to take hold of (every 2nd counts).
One time you've mixed all the buckets of floor leveler, become back to the first and mix it up once again for a few seconds in lodge to stir up the sand that settled. Pull the mixer out and set it in the next bucket to be hauled in. Later on dumping each bucket, fluff up the sand in the adjacent 1 before hauling it in.
NOTE: V-gallon buckets are not big plenty for mixing cocky-leveler. Get yourself equally many 6-gallon buckets as you can.
15 / 17
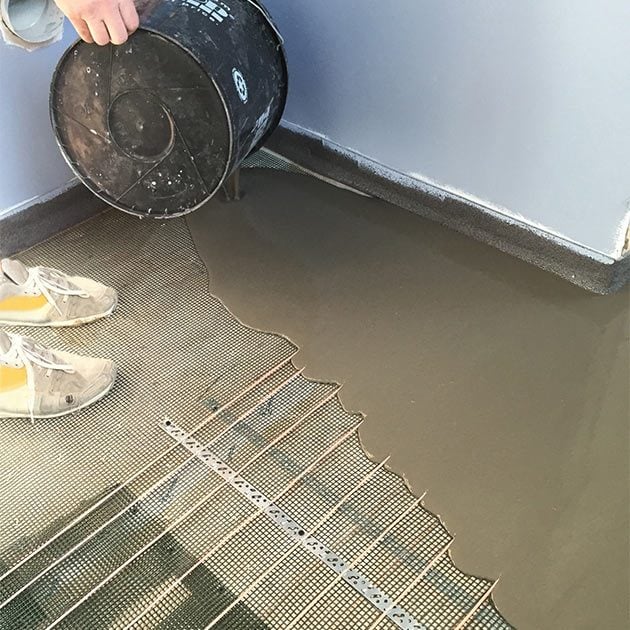
Spread every bit You Cascade
Move the bucket along the flooring as you pour. Keep the bucket low to minimize splashing. If you exercise splash on the wall, try to resist the temptation of wiping it off right away considering small drops can quickly go big smudges. Y'all'll have better luck letting it dry and scraping information technology off.
Completely cover the heating cables/mats with floor leveler to avoid damaging them with a trowel while installing the thin set up. The thickness of your pour may vary depending on your project but shoot for a thickness between ane/two in. and 3/iv in. Anything over 3/4 in. will probable require two pours, but confirm that by reading the instructions printed on the bag of the product your using. Bank check the thickness with a gauge rake, a junky record measure or just a Popsicle stick with the desired thickness marked on it.
Move Flooring Leveler With a Gauge Rake
A gauge rake is a metal squeegee that rides on two adjustable depth guides. This tool isn't absolutely necessary, merely it does work well at spreading the leveler around, and it helps to "estimate" how thick the self-leveler is. Be careful to work the rake very gently nigh the heating cables or mat.
xvi / 17

Pour Your Way Out
Get-go at the far finish of the room and piece of work your way to the door. If you pass other entry points along the style, make certain to lock the doors and hang "keep out" signs and so no one gets stuck in floor leveling compound.
17 / 17

Wash Buckets Right Away
Launder your buckets as before long equally you're washed pouring the flooring leveler and never dump the muddy water downward a drain.
Originally Published: February ten, 2021

Can You Shoot Nails Through Floor Leveling Compound,
Source: https://www.familyhandyman.com/list/tips-for-working-with-self-leveling-underlayment/
Posted by: walkerhavoing.blogspot.com
0 Response to "Can You Shoot Nails Through Floor Leveling Compound"
Post a Comment