

How To Make A Steampunk Hat
Cardboard Steampunk Top Hat Tutorial
How to make your own steampunk Tophat
UPDATE: I have recently come upwards with a much more comfortable version of this mode of hat, using foam as the primary material. It's still inexpensive and easy to access while solving the fit and comfortability issues nowadays in the cardboard version. Watch the tutorial below for more information, or purchase the pattern in my shop .
Alright, hither nosotros go. The tutorial I know at least one person has been waiting for.... First the supplies
-
A canvas of heavyish, non corrugated cardboard. Approx ane.5 mm thick
-
glue gun and glue
-
some thinner cardboard for the plates- like a cereal box or file binder
-
5 minute epoxy
-
contact cement
-
flat black acrylic paint
-
Rub due north' Buff antique gold and pewter

Steampunk Tophat Skirt
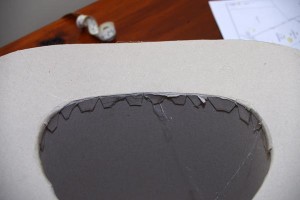
Okay, the first thing to practise is figure out what size it needs to be to fit your head, which I failed at miserably, the hat catastrophe upwardly too small for my caput. So I guess y'all are on your own for that. I think the problem was that the skirt fit my head nicely when apartment, but as I gave it some curve while putting information technology on the hat, that shortened the distance from front to back, making it too tight in the front to back dimension. So, make sure the head cutout is nice and oval. As you lot can see in that location are tabs left to attach the brim to the hat cylinder.

Next I made the cylinder, again, probably better to make information technology a little too big rather than as well pocket-sized. Too, the tabs from the brim are going to fold up within which will too make the fit smaller. I remember it actually might be the best to start with the cylinder, get it right and so trace that and cut out the skirt.- just thinking on the wing here :) Anyways, I didn't want the cardboard to overlap on the seam and so I cut another strip of cardboard out and used hot glue on the inside of the chapeau, with the strip overlapping both sides.

tophat curve
I figured out a prissy curve to give the brim some shape and then the hat wouldn't end upward looking like a prop from a primary schoolhouse play about Abraham Lincoln. I just drew it on freehand, trying to proceed both sides equal, and trying to have it one nice continuous curved shape without any flat spots.
Gluing the tabs
Now, I aptitude up all the little tabs on the brim and fit it into the curve of the cylinder. It didn't fit exactly and I had to cutting some of the tabs deeper and then that it would. Hopefully you will have more luck/skill and it will fit perfectly the showtime fourth dimension! Once it fit, I grabbed my hot glue gun and started glueing the tabs from the skirt onto the cylinder. Watch out for burnt fingers.

Gluing the plates on
Now for the fun part. I got some thinner paper-thin from some cereal boxes and cut them into many random squares and rectangles. Simply cut a large stack. Then I applied the contact cement to a portion of the chapeau, say maybe i/4 of the cylinder. I so also applied the contact cement to the backs of a bunch of the cardboard cutouts. With contact cement you apply it to the separate surfaces, and then allow both surfaces go dry to the affect, and then you put them together, creating an instant bond. So in one case both the chapeau and the pieces were dry to the touch on ( about 5 min) I started randomly sticking the squares on. Of course wherever a new piece overlapped another piece, I would add a bit more cement where it would overlap.

It is O.K. to leave some of the original hat showing through, because it will just look like another piece of metal has covered it up. Around the seam where the skirt meets the cylinder can be tricky, try to accept relatively narrow strips of cardboard crossing it. For the tiptop of the hat, I cut an oval larger than I would need and only glued it right on to the cylinder from the within. It doesn't have to be pretty, considering it is going to become completely covered anyway. I and then trimmed information technology off from the outside with some pair of scissors.

And comprehend the top equally well. I didn't endeavor to get the cardboard to curve around the edges. I just put them on flat so went around the tiptop with scissors again to trim them all off.


Here are the strips I am going to use to cover that gap around the peak of the chapeau. I cut lots of footling "5"s into the strip and and then I used the contact cement to stick them around the peak of the chapeau. Also I might mention that you don't have to be too careful if some of the contact cement is not covered up by paper, it all only adds to the crude old feel of the hat once it is all covered up with paint.
Now, just glue those top flaps down.

Rivets on steampunk meridian hat
At present let's brand some rivets!
Accept some two function v infinitesimal epoxy, and mix up a footling batch. And then, using a stick or something with a rounded end, dip it in the epoxy and and so on the paper-thin, leaving a small raised dot on the cardboard. Keep doing this until you lot have traced the overlapping edge of all sheets of cardboard. You will have to figure out how much is the right amount of epoxy to mix, that you can employ earlier it sets. You volition end up mixing lots of batches of epoxy by the fourth dimension you are finished.

After painting the pinnacle lid black
Paint it Black. I used artists acrylic paints because that was the simply blackness paint I had, you could probably utilize low gloss regular acrylic interior pigment also. But I would stick with h2o based paints every bit the Rub Due north' Buff seems to piece of work best over that.

Rub Due north' Buff on Pinnacle Hat
The Rub N' Buff I practical using just a little on my finger and rubbing information technology on actually lightly. You want it to highlight the rivets and the "metallic plates" and then y'all don't desire to apply it and so thoroughly that all the crevices get filled. To start with, to get a feel, I would dip my finger in a little Rub N' Buff and then wipe it on a piece of newspaper until there was inappreciably any on my finger. Then rub it onto the hat. This gives a experience for how fiddling Rub N' Buff you really need.
UPDATE: I no longer utilise Rub 'n Buff every bit my preferred metallic paint, and lately I've experimented with using DecoArt's Metallic Lustre wax paste, Americana Decor Metallics, and Basics metallic pigment. You lot tin come across me applying the Rub 'n Buff on my Cream Top Hat Tutorial and using the American Decor Metallics and Basics Statuary on my Steampunk Shoulder Armor tutorial. Nix over to the 9 minute marker to see the painting technique. You lot tin can likewise find links to the paints I use on my project supplies page.

Steampunk Height Hat Tutorial

Source: https://www.lostwaxoz.com/blog/2012/05/cardboard-steampunk-top-hat-tutorial
Posted by: walkerhavoing.blogspot.com
0 Response to "How To Make A Steampunk Hat"
Post a Comment